Azure Migrate is a central hub for tools to discover, assess, and migrate on-premises servers, apps, and data to the Microsoft Azure cloud. Azure Local is a hyperconverged infrastructure system solution that hosts virtualized Windows and Linux workloads in a hybrid environment. You can use the Azure Migrate platform to move on-premises VMware VMs to your Azure Local instance.
For more information on the Azure Migrate platform, see About Azure Migrate.
Benefits
Here are the benefits of using Azure Migrate to migrate your on-premises VMware VMs to Azure Local. This solution:
- Requires no preparation for your VMware VMs including installation of agents prior to migration.
- Provides the control plane via the Azure portal. You can use the portal to start, run, and track your migration to Azure Local.
- Keeps the data flow local, from on-premises VMware source servers to Azure Local.
- Results in a minimal downtime for the VMs running on your on-premises VMware servers.
Migration components
With Azure Migrate, you can choose to migrate your data from your on-premises environment to Azure or to your on-premises Azure Local instance.
The following diagram shows the migration process to your on-premises Azure Local instance using Azure Migrate:
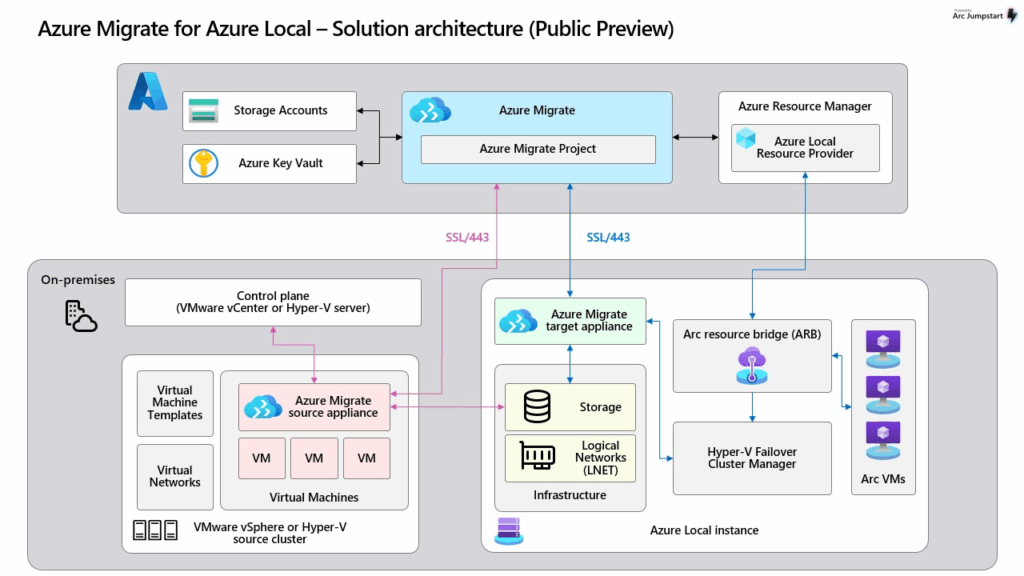
The migration process includes the following key components, organized into two layers:
Azure layer:
- Azure Migrate project. Central to the migration process, used to orchestrate discovery of source VMs and replication of VMs. Both the source and target appliances must register with this project.
- Storage Accounts and Key Vault. Used for storing metadata and replication state data.
- Azure Resource Manager (ARM). Orchestrates and manages resources across Azure and Azure Local by interacting with the Azure Local Resource Provider.
On-premises layer:
- Source servers (VMware/Hyper-V). Host the VMs to be migrated.
- Azure Migrate source appliance. Runs on the on-premises VMware or Hyper-V cluster to discover and prepare VMs for migration.
- Azure Migrate target appliance. Runs on the Azure Local instance, which receives the migrated VMs.
- Arc Resource Bridge (ARB) and Hyper-V Failover Cluster Manager. Used for orchestration and VM provisioning.
Note: The disks and data of VMs (VMware/Hyper-V) being migrated aren’t stored in the associated Azure Storage account. Only metadata and replication data are stored in the Azure Storage account.
Migration phases
Here are the key phases of the migration process:
1/ Prepare — Prepare to migrate by completing the migration prerequisites. Deploy, configure, and register your Azure Local instance. This system is the migration target. Create an Azure Migrate project and an Azure Storage account in Azure. For more information, see Review prerequisites for Azure Migrate.
2/ Discover — Create and configure an Azure Migrate source appliance on VMware. Use this appliance to discover your on-premises source VMware servers. For more information, see Discover VMware VMs.
3/ Replicate — Create and configure the target appliance on your Azure Local. Select and replicate the VMs that were discovered in the previous step. For more information, see Replicate VMware VMs.
4/ Migrate & Verify — Once the replication is complete, select and migrate VMware VMs to your Azure Local. After the migration is complete, verify that the VMs have booted successfully and the data has migrated properly. You can now pause the replication and decommission the source VMware VMs. For more information, see Migrate and verify VMware VMs.
Next Steps
To prepare for VMware migration, see the following articles:
- Review the requirements for VMware VM migration to Azure Local.
- Complete the prerequisites for VMware VM migration to Azure Local.
This article appears courtesy of Microsoft.